Archive for the ‘DIY’ Category
Kitchen Complete
My kitchen is finally complete!

Here is what it looked like before

Here is what it looked like at week one.
The seven weeks that I was unable to use my kitchen was immensely painful. For someone who loves cooking, it was more painful than indian burns, or plucked nose hairs, or wedgies, or charlie horses, or forehead flicks, or arm pinches, or a kick in the groin. Okay definitely not as bad as a kick in the groin but you get what I’m saying…
While my kitchen was out of commission, I ate out almost every day. I had tons of Ono Hawaiian BBQ, In-N-Out, Rubios, In-N-Out, Chipotle, In-N-Out, In-N-Out, In-N-Out, Panda Express, In-N-Out, Subway, In-N-Out, In-N-Out, Chick-fil-A, In-N-Out and some more In-N-Out. While I could not cook anything for myself, I had an extremely well balanced In-N-Out diet and washed that down with tons of neapolitan shakes.
Surprisingly, I only gained 3-4 LBS during this dark time of my life.
Here are some pictures of what a kitchen mold mitigation/remodel looks like when mold decides to invade the cabinets underneath the sink:

Sucking the mold spores


A project that was supposed to take 2-3 weeks ended up taking 7 weeks. The contractor that my insurance set me up with was pretty horrible too. The entire time he was trying to screw me over telling me that they did extra work, needed to change things, denying that they broke my front screen door, said they did work when they really did not do it, and tried to hit me up with extra costs.
After seeing how cute his attempts were to overcharge me the first couple of weeks, I got sick and tired and finally revealed to him that I work in construction and that I have been taking pictures of their progress on a daily basis. Then I flooded him with emails and pictures and showed him why he was wrong (and I copied his boss on the emails too). And for some odd reason he stopped picking up my phone calls and only communicated to me through email. I guess he chickened out but in the end I did not have to pay any extra money for all their screw ups.
Looking back, I realized how much fun I really had dealing with this guy…Not.
I guess a ton of BBQ and dinner parties are on the schedule for the rest of summer.
Until next time, Cheers!
Kitchen Mold

Thanks mold
The new kitchen is currently being rebuilt. Stay tuned for updates.
DIY Wetsuit Repair
A few months ago I tore my wetsuit. Big time.
The swell was pretty big and I was surfing a lot better than I usually do. I was catching wave after wave and getting pretty decent rides and then got overly confident and tried to do an aerial. In fact, I tried to do a 360 aerial. Did I know how to? I thought so. Did I succeed? Heck no. Not even close. What occurred instead was a gnarly wipeout and a two inch gash to my wetsuit near my calf muscle. That’s what I get for trying to be cooler than I really am…
So for the past few months I’ve been surfing with a gaping hole in my protective warmth suit. The cold ocean water has been relentless in invading my lower leg to make surfing in the winter time a miserable experience. The fact that I have been too lazy to repair this has allowed for the frigid ocean water to shoot up through my leg and refrigerate my crotchular region and that makes surfing pretty unpleasant to say the least.


The 2 inch gash and another 1 cm hole that needs repair
My materials:

McNett neoprene cement ($9), scissors, dental floss, needle, toothpicks (not shown), neoprene patch (which I didn’t need) and some kind of clamps
Repair #1: Smaller Tears
Let’s do the easy fast repair on the smaller tear first. I trimmed away some of the little frills along the rip with the scissors and the put the cement on a piece of paper. I then used the toothpick to apply the cement to the inside edges of the rip.

A big shout out to Mira Costa Community College who have been sending me their course catalog for the past ten years…

I only put it on the inside edges for now. You don’t need to use a lot of the cement…just enough to cover the inside edges.
Also, a good idea is to put some kind of paper inside the wetsuit so you don’t accidentally glue to the other side of the suit. After I put the cement on the inside edges of the little tear, I clamped it and waited for five minutes.

Make sure the clamp does not touch the neoprene cement.
After five minutes, remove the clamp and put the edges together. You can use your fingers to push the edges together to make sure they get a good stick and then use more cement from the toothpick and apply it on the exterior of the wetsuit.

I’ve only applied the cement halfway along the exterior in this picture to show you what it looks like.
Then you let it sit for ten minutes and you’re done with that.
Repair #2: Bigger Tears
So the method is pretty much the same except for the need to stitch up the tear because its so big.

I clamped both sides and then applied some of the cement using a toothpick…

After five minutes, I removed the clamps and pressed the edges together.


During the five minutes that you are waiting for the cement to cure, you can thread the dental floss through the needle and tie it off. You may need all five minutes because it is difficult. It only took me one try because my ninja fingers never screw up. But then I had to wait for 4:55 for the cement to cure…


When you stitch, don’t go all the way through. Go about halfway into the suit. That way you don’t have floss sticking out the other side when you have your wetsuit inside out.

Done stitching
After you tie off the dental floss, apply one more layer of cement over the stitching. I used the brush this time instead of the toothpick because it was covering up a larger area and the floss too.

The completed repair
Both of these repairs took me about forty minutes total from the time I put my wetsuit down on the work table to the time I threw all the trash away. I would say the difficulty level would be about a 2/10 or if you did not know how to stitch, maybe a 3/10.
Here’s a recap of the steps:
1. Put paper on the inside of the tear to prevent cement from getting all over the inside of the wetsuit.
2. Apply cement to the inside edges of the tear. Use a clamp to hold it open for five minutes.
3. Remove clamp and push the inside edges together.
4. If it’s a big tear, use dental floss to sew it up.
5. Apply cement to the exterior of the tear. Wait ten minutes for it to fully cure.
Donesies.
Let me know if you have any questions. I’ll try to help out but I think it is pretty straight forward. I’ll definitely post an update after I take the suit out tomorrow in my afternoon session.
Until next time…cheers.
Update:
The good news: the wetsuit held up really well. I guess I did a pretty good job on the repairs and was pretty impressed with the results.
The bad news: there seems to be multiple tiny holes around some sensitive areas of my body.
DIY Superhero
When I was a kid, I wanted my mom to buy me some metal plates and green fabric so I could make myself a costume for Halloween. My character? Reptile from Mortal Kombat. I was convinced that I would make the best DIY costume ever created.

I had images in my mind that I would show up at school looking super BA with real armor and metal face mask and if anybody would dare laugh at my costume, I’d do what Reptile did to Subzero in the picture above…and also raise my hands like I just won a two minutes early to recess pass. And although my mom vetoed my decision, I still had a blast at Halloween that year. I think.
Anyway, here are a few other good DIY ideas if you want to make a superhero costume:

No…it’s not Cyclops. It’s King of Powerpoint Presentations Man

It’s not Magneto…it’s Bucket Man With Nasty Wrinkly Hands

Wolverine will always be ready for dinner.
Apparently, certain grownups are super enthralled by this fantasy lifestyle. It brings me back to the Epic Ogre Battle from years ago:
What is so sad about this you may ask..? A few possible reasons:
1. Grown nerd adult boosting his self confidence by throwing toy darts at another fellow nerd adult.
2. Sucking really bad at fake battle that you die early and have to lay their watching other people fake battle.
3. Cheering for your boyfriend/husband while you secretly wish your son does not turn out this way.
Here’s what the nerds wished was happening instead:
Master Bedroom Closet
I spent the past weekend building a master bedroom closet system for my very naked green reach in closet area. A lot of time went into the planning and research because quite honestly, I had no idea what I was doing. The most difficult process was figuring out exactly what I wanted without seeming too feminine. After telling a lady at church about my closet project, she gave me a confused look and asked, “Since when do men care about a nice closet system?” My witty response was, “…ha…ha yea I know right..?” duuurr
Anyway, here we go:

This is the plan. Yes, I need a lot of space for all the junk I’ve accumulated over the years. Lacrosse, lacrosse and more lacrosse junk…


I made a quick painter’s tape layout the night before just to make sure everything was legit. I didn’t want to have areas that I could not reach into. I also wanted to designate a spot for my dirty laundry hamper thing…
End of Day One Stats:
Motivation Level: 10/10
Confidence Level: 9/10
Injuries: 0
The next morning I went to Home Depot to pick up all my building materials. Lots of pre-made shelving that weight a ton and 1″x2″,3″ studs for the wall cleats. The thought running through my mind over and over while driving home was is my wall really going to hold all of this weight!?? I got home, walked to the back of my car and it suddenly dawned on me. What on earth am I getting myself into!?

End of Morning Stats:
Motivation Level: eh…4/10?
Confidence Level: 1/10
Injuries: 1 (smashed my finger between the heavy shelvings while I was loading them onto the cart)

I started nailing the cleats into the wall for the top shelf. I left a 3/4″ gap where the vertical panels would go.


Then I cut the shelf cleats (okay…dude I don’t even know if they’re referred to as ‘cleats’ but thats what I’m going to call them from now on) to be equal lengths. After I put the first one on the wall, I marked where the stud was located on the other pieces. This would save me time from using the stud finder everytime I wanted to nail them onto the wall. Make sense? Yes. Moving on. What you get is a lot of saved time and the pictures below:


I then put the top shelf onto the cleats. I tried nailing the shelf down in the back and although that was fine, I quickly went with the drill. I drilled a small pilot hole (1/8″) and then screwed in the nails with the drill which was what I should have done from the beginning. Standing on a ladder and reaching far in the back to hammer a nail was just awkward and it was a lot easier to handle the tight corners with a drill.


The vertical panels go in next to support the top shelf. An important note: Make sure the bottom cleats are 3/4″ longer on each side. The panels will rest on these supports as you drill in the anchor screws from the top shelf and the side panels into the cleats.
After this point, I felt like a pro for some reason. Stupid confident amateur.
Early Afternoon Stats:
Motivation Level: 10/10
Confidence Leve: 11/10
Injuries: 1 (I found I cut my hand somewhere along this process, but was probably too excited to notice)
The rest of the process is just cutting and securing the panels. Here are some pictures for the rest of Day One:


At the end of day one, I only had the shelving panels left to attach but I kept that portion for tomorrow. I didn’t want to bother my neighbors with cutting, drilling and loud noises so I called it a night.
The next day was fairly easy with the shelves. I cut a bunch of them to length, and attached them from the side panels with screws. Took me only a couple hours.


I used some old closet rods for the clothes hanging area. I did not want to get to where I was cutting metal because I have never done it before. I laid out the area by measuring the length of my existing rod and adding 1/2″ to account for the brackets.

I added a nice little carpet to the area for now and I’m done!…for now


I still have two other rods to install and half a closet to caulk. Once I get the job completed, I’ll post pictures of the final product.
Until next time…thanks for stopping by. Stay classy San Diego.
Homemade Surfboard Rack
I took a break from doing all the home remodeling to do some space organizing for my condo. The single biggest thing that I need to address is to build a closet organization system for the master bedroom, so what do I do instead?… I build surf racks for my wall to make it look less empty.
After countless hours (approx 3-4 hours) of meandering online for DIY projects, ideas, and information on how to build a surfboard wall rack, I realized that there wasn’t really anything out there to my liking. People make some really goofy/tacky looking homemade junk and are somehow proud of it. Another thing was the cost, they kept it cheap at around $40-$50 in materials, but I wanted cheaper. Why? …because I’m really damn cheap.
Here are some that I found online which I just could not see myself making and putting up in my condo:


These are great if you move a lot or need something portable. I simply cannot afford to lose that much floor space
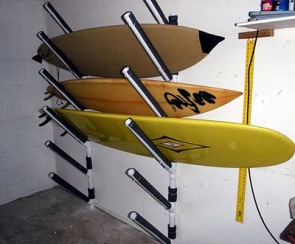
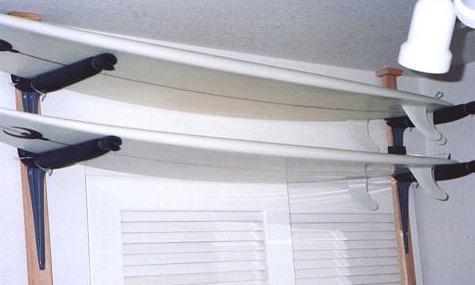
These just look too tacky for me. I would never put anything like this up in my place.

This is the one I would have liked to build if I was able to. It looks great to have a designated spot in your backyard for surfboards and wetsuit but unfortunately my backyard is shared with everybody else. I would actually recommend this one if you were able to do it.
So, many of the online DIY ideas are decent but most of them just aren’t my cup of tea. I did a little brainstorming and figured that I wanted a display rack to not only keep things organized and off the floor, but to keep things sexy as well. I went down to home depot and picked up a bunch of items and got to work. The following tutorial-of-awesome will hopefully help any fellow surfers out there who are looking for a simple, quick and cheap solution which looks great…not your Mickey Mouse quality surfboard rack that looks frumpy.

There you have it. My materials: 1/4″ Dowel, 3/4″ Dowel, some wood pieces for stair moulding?, wood blocks, 1.5″ and 2.5″ long wood screws, shelf lining, and a bottle of water to stay hydrated.


These 13″ long wood pieces were cut down to 12.5″


I marked center holes at the end of the wood pieces and the base. Then I drilled a hole through the base and 1″ into the wood piece.
Then I took a water break.


I cut the 3/4″ dowel to 1.5″ length and the 1/4″ dowel to 1.25″ length


Using my 1/4″ drill bit, I put holes at the rounded side of the wood piece and the 3/4″ dowel


Connect everything just like the lego-maniac you were in your youth. Use a little bit of glue to make sure they stick well.

This is what you should have so far

You will be attaching it through the base like this using the 1.5″ wood screws which should be easy if you drilled a pilot hole.


Now you have an army of brackets and the first glance of how it will look against the wall. I caulked the joints where all the wood pieces met up but this is optional I guess.

I painted the brackets to match my accent wall with the left over paint I had


I cut strips of the shelf liner to cushion my board against the bracket. They’re about 12″ long and 7/8″ wide. I also cut a little piece to go on the dowel.
DONE! Now you have to hang it evenly. I spaced out the brackets about 32″ because wall studs are typically located 16″ apart. You want to make sure you find the studs and mount the brackets to them.

Mounted the first set, they are level!
I used the level to find the spot under the first set so they lined up straight. The wall display racks came out rather nicely in my opinion:


There you have it, two surfboard wall display racks for $32 and some change from Home Depot. Comes out to $16 per set for a sick looking display rack for your froth bone collection. I even have some extra material left over for more racks that I plan on making in the near future (update: Need to buy more shelf liner after Mother stopped by last night and thieved it from me). I have enough dowels for 3-4 more sets which can save on cost when I decide to build more for my long board and guest boards for buddies to stay over.
Until next time…stay classy San Diego.


